

Play Store Application link – https://play.google.com/store/apps/details?id=com.ideepro.java25hours
Learn with Youtube video –
IMPORTANT – We need any database to learn this topic – Mysql recommended (Free and easy to use)
To set up MySQL in Windows for Java development, you will need to follow these steps:
- Download and install the MySQL Community Server from the MySQL website (https://dev.mysql.com/downloads/mysql/).
- Go to the MySQL website.
- Under the “MySQL Community Server” section, click on the “Download” button for the Windows platform.
- On the next page, click on the “No thanks, just start my download” button to start the download.
- Once the download is complete, open the downloaded installer file and follow the prompts to install MySQL. Make sure to set a root password during the installation process.
- Note – If you are using MSI Installer it will include Connector/J library already, so you can skip step 2.
- Download and install the MySQL Connector/J library, which is a JDBC driver for MySQL.
- Go to the MySQL website and click on the “MySQL Community Downloads” link in the top menu.
- Under the “Connector/J” section, click on the “Download” button.
- On the next page, choose the appropriate version of the connector (e.g., “Platform Independent”) and click the “Download” button.
- Once the download is complete, open the downloaded installer file and follow the prompts to install the connector.
- Set the CLASSPATH environment variable to include the path to the MySQL Connector/J JAR file.
- Open the Start menu and search for “Environment Variables”.
- Click on the “Edit the system environment variables” button.
- In the “System Properties” window, click on the “Environment Variables” button.
- Under the “System Variables” section, scroll down and find the “CLASSPATH” variable. If it doesn’t exist, click the “New” button to create it.
- In the “Edit Environment Variable” window, enter the path to the MySQL Connector/J JAR file (e.g., “C:\mysql-connector-java-8.0.23.jar”) in the “Variable value” field. Make sure to separate multiple paths with a semicolon (;).
- Click the “OK” button to save the changes.
- Test the connection to the MySQL server from Java.
- Create a new Java file and copy the example code provided below* into it.
- Replace “password” with the root password that you set during the MySQL installation process.
- Save the file and compile it using the Java compiler (javac).
- Run the compiled program using the Java runtime (java). If the program runs successfully, it will print “1” to the console.
[*] – Don’t worry this is just to test, we learn everything about it.
import java.sql.*;

public class Test {
  public static void main(String[] args) {
    try {
      // Load the MySQL driver
      Class.forName("com.mysql.cj.jdbc.Driver");

      // Connect to the MySQL server
      Connection conn = DriverManager.getConnection(
          "jdbc:mysql://localhost/test", "root", "password");

      // Execute a simple SQL statement
      Statement stmt = conn.createStatement();
      ResultSet rs = stmt.executeQuery("SELECT 1");

      // Print the result
      while (rs.next()) {
        System.out.println(rs.getInt(1));
      }
    } catch (Exception e) {
      e.printStackTrace();
    }
  }
}
💡JDBC Definition-
Jdbc is concept where java program connect with database.
💡JDBC API-
1-java.sql
2-javax.sql
Here is a tabular comparison between the two packages:
| Package | Description |
|---|---|
java.sql | Contains the core JDBC classes and interfaces, including Connection, Statement, and ResultSet. Also includes classes for representing SQL data types such as Date and Time. |
javax.sql | Contains additional classes and interfaces that build upon the core JDBC API. Includes the DataSource interface for connection pooling and the RowSet interface for a disconnected view of data. |
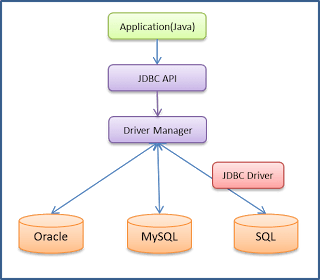
JDBC driver is s/w component that enables java application to interact with database.
💡There are 4 types of JDBC drivers.
Here is a tabular comparison of the different types of JDBC drivers:
| Driver Type | Description | Pros | Cons |
|---|---|---|---|
| JDBC-ODBC bridge | Uses ODBC driver to connect to the database | Can use existing ODBC drivers | Deprecated in Java 8 and removed in Java 9 |
| Native-API driver | Communicates directly with the database using the database’s native API | Fast | Specific to a particular database |
| Network Protocol driver | Communicates with the database over a network using a database-independent protocol | Can be used with any database that supports the protocol | May be slower than native-API driver |
| Thin driver (Widely used) | Pure Java implementation of the database’s protocol | Small and fast | May not be as efficient as native-API driver |

💡-:[5 STEPS TO CONNECT TO DATABASE]:-
:
| Step | Description | Code Snippet |
|---|---|---|
| Register the driver class | This step involves loading the driver class for the database you want to connect to. This is typically done using the Class.forName() method, which allows you to specify the fully qualified name of the driver class. | Class.forName("com.mysql.cj.jdbc.Driver"); |
| Creating a connection | This step involves establishing a connection to the database using a URL and a set of connection properties. The URL typically includes the database name, hostname, and port number, and the connection properties may include the username and password to use for authentication. | Connection connection = DriverManager.getConnection("jdbc:mysql://localhost:3306/mydatabase", "username", "password"); |
| Creating a statement | This step involves creating a statement object, which is used to execute queries on the database. There are several types of statements available, including Prepared Statement, Callable Statement, and Statement. | Statement statement = connection.createStatement(); |
| Executing queries | This step involves using the statement object to execute a SQL query on the database. This can be used to select, insert, update, or delete data from the database. | ResultSet resultSet = statement.executeQuery("SELECT * FROM mytable"); |
| Closing the connection | This step involves closing the connection to the database, which frees up resources and ensures that the connection is no longer being used. This is typically done using the connection.close() method. | connection.close(); |

Here is a complete example of how to connect to a MySQL database in Java and execute a simple query to retrieve data from a table:
import java.sql.*;

public class MySQLExample {
    public static void main(String[] args) {
        // Step 1: Register the driver class
        try {
            Class.forName("com.mysql.cj.jdbc.Driver");
        } catch (ClassNotFoundException e) {
            e.printStackTrace();
            return;
        }

        // Step 2: Create a connection
        Connection connection = null;
        try {
            connection = DriverManager.getConnection("jdbc:mysql://localhost:3306/mydatabase", "username", "password");
        } catch (SQLException e) {
            e.printStackTrace();
            return;
        }

        // Step 3: Create a statement
        Statement statement = null;
        try {
            statement = connection.createStatement();
        } catch (SQLException e) {
            e.printStackTrace();
            return;
        }

        // Step 4: Execute a query
        ResultSet resultSet = null;
        try {
            resultSet = statement.executeQuery("SELECT * FROM mytable");
        } catch (SQLException e) {
            e.printStackTrace();
            return;
        }


        try {
            while (resultSet.next()) {
                int id = resultSet.getInt("id");
                String name = resultSet.getString("name");
                System.out.println("id: " + id + ", name: " + name);
            }
        } catch (SQLException e) {
            e.printStackTrace();
        }

        // Step 5: Close the connection
        try {
            connection.close();
        } catch (SQLException e) {
            e.printStackTrace();
        }
    }
}
Important notes –
💡1- Here is a summary of the different getConnection methods in Java:
| Method | Description |
|---|---|
DriverManager.getConnection(String url) | Establishes a connection to the database specified by the url argument. |
DriverManager.getConnection(String url, String user, String password) | Establishes a connection to the database specified by the url argument, using the specified user and password. |
DriverManager.getConnection(String url, Properties props) | Establishes a connection to the database specified by the url argument, using the connection properties specified in the Properties object. |
DataSource.getConnection() | Obtains a connection from a DataSource object. |
💡2-Create SQL Statement
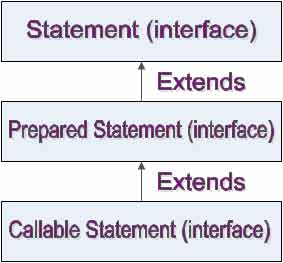
Here is a tabular comparison of the types of JDBC statements in Java with code snippets for each type:
| Type of Statement | Description | Code Snippet |
|---|---|---|
Statement | The Statement interface is the most basic way to execute a SQL statement. It can be used to execute any type of SQL statement. | Statement stmt = conn.createStatement(); String sql = “SELECT * FROM Employees”; ResultSet rs = stmt.execute Query(sql); |
PreparedStatement | The PreparedStatement interface is a more efficient way to execute a SQL statement. It can be used to execute any type of SQL statement, but is most commonly used for SELECT, INSERT, UPDATE, and DELETE statements. The Prepared Statement is pre-compiled on the database server, which makes it faster to execute than a Statement. | String sql = “INSERT INTO Employees (id, name, age, salary) VALUES (?, ?, ?, ?)”; PreparedStatement pstmt = conn.prepare Statement(sql); pstmt.set Int(1, 1); pstmt.set String(2, “John”); pstmt.set Int(3, 30); pstmt.set Double(4, 45000.0); pstmt.execute Update(); |
Callable Statement | The Callable Statement interface is used to execute stored procedures on the database server. A stored procedure is a pre-compiled SQL statement that can be called by name. | String sql = “{call get Employee(?, ?, ?)}”; Callable Statement cstmt = conn.prepare Call(sql); cstmt.set Int(1, 1); cstmt.register OutParameter(2, java.sql.Types.VARCHAR); cstmt.register OutParameter(3, java.sql.Types.DOUBLE); cstmt.execute(); String name = cstmt.get String(2); double salary = cstmt.get Double(3); |
💡3- Execute SQL Statement (Methods)
Here is a tabular comparison of these methods:
| Method | Returns | Used for | Example |
|---|---|---|---|
executeQuery(String sql) | ResultSet | SELECT statements | ResultSet rs = stmt.executeQuery(“SELECT * FROM Employee WHERE department = ‘Sales'”); |
executeUpdate(String sql) | int (number of rows affected) | INSERT, UPDATE, DELETE, and DDL statements | int rowsAffected = stmt.executeUpdate(“UPDATE Employee SET salary = salary * 1.1 WHERE department = ‘IT'”); |
execute(String sql) | boolean (indicates whether the result is a ResultSet or an update count) | Any type of SQL statement | boolean isResultSet = stmt.execute(“CREATE TABLE Department (id INT PRIMARY KEY, name VARCHAR(255))”); |
0- Stored Procedure and Callable statement example-
1- create and execute a stored procedure in MySQL that returns all the data from a table:
CREATE PROCEDURE get_all_data()
BEGIN
  SELECT * FROM mytable;
END
This stored procedure creates a cursor called “data_cursor” that selects all the data from the “mytable” table, and then opens the cursor.
To execute this stored procedure and retrieve the data in Java, you can use the following code:
import java.sql.*;

public class MySQLExample {
    public static void main(String[] args) {
        // Step 1: Register the driver class
        try {
            Class.forName("com.mysql.cj.jdbc.Driver");
        } catch (ClassNotFoundException e) {
            e.printStackTrace();
            return;
        }

        // Step 2: Create a connection
        Connection connection = null;
        try {
            connection = DriverManager.getConnection("jdbc:mysql://localhost:3306/mydatabase", "username", "password");
        } catch (SQLException e) {
            e.printStackTrace();
            return;
        }

        // Step 3: Create a statement
       CallableStatement cs= null;
        try {
            cs = connection.prepareCall("call get_all_data()");
        } catch (SQLException e) {
            e.printStackTrace();
            return;
        }

        // Step 4: Execute a query
        ResultSet resultSet = null;
        try {
            resultSet = statement.executeQuery();
        } catch (SQLException e) {
            e.printStackTrace();
            return;
        }


        try {
            while (resultSet.next()) {
                int id = resultSet.getInt("id");
                String name = resultSet.getString("name");
                System.out.println("id: " + id + ", name: " + name);
            }
        } catch (SQLException e) {
            e.printStackTrace();
        }

        // Step 5: Close the connection
        try {
            connection.close();
        } catch (SQLException e) {
            e.printStackTrace();
        }
    }
}
1- Table creation and Data insertion 💡
database =test
mysql username=root
mysql password=root
table=user
package jd;

import java.sql.*;

public class ExInsertStatement {

public static void main(String[] args) throws ClassNotFoundException, SQLException {
Class.forName("com.mysql.cj.jdbc.Driver");
Connection con = DriverManager.getConnection("jdbc:mysql://localhost/test", "root", "root");

Statement st = con.createStatement();
st.execute("CREATE TABLE IF NOT EXISTS user(name VARCHAR(20), age INT(10))");

PreparedStatement pst = con.prepareStatement("insert into user values (?,?)");
pst.setString(1, "java");
pst.setInt(2, 10);

pst.executeUpdate();

System.out.println("done");
}
}
2- Data Updation 💡
package jd;

import java.sql.*;

public class ExUpdateStatement {

public static void main(String[] args) throws ClassNotFoundException, SQLException {
Class.forName("com.mysql.cj.jdbc.Driver");
Connection con = DriverManager.getConnection("jdbc:mysql://localhost/test", "root", "root");

PreparedStatement pst = con.prepareStatement("update user set name=? where age=?");
pst.setString(1, "core");
pst.setInt(2, 10);

pst.executeUpdate();

System.out.println("done");
}

}
3-Data Fetching/Retrieve 💡
package jd;

import java.sql.*;

public class ExSelectStatement {

public static void main(String[] args) throws ClassNotFoundException, SQLException {
Class.forName("com.mysql.cj.jdbc.Driver");
Connection con = DriverManager.getConnection("jdbc:mysql://localhost/test", "root", "root");

PreparedStatement pst = con.prepareStatement("select * from user");
ResultSet rs = pst.executeQuery();

while (rs.next()) {
System.out.println(rs.getString("name"));
System.out.println(rs.getInt("age"));
}
}

}
4- Data deletion 💡
package jd;

import java.sql.*;

public class ExDeleteStatement {

public static void main(String[] args) throws ClassNotFoundException, SQLException {
Class.forName("com.mysql.cj.jdbc.Driver");
Connection con = DriverManager.getConnection("jdbc:mysql://localhost/test", "root", "root");

PreparedStatement pst = con.prepareStatement("delete from user");
pst.executeUpdate();

System.out.println("done");

}

}
Interview Questions —
- What is JDBC ?
- What are steps to connect with database?


Thank you for your sharing. I am worried that I lack creative ideas. It is your article that makes me full of hope. Thank you. But, I have a question, can you help me?
Thanks for sharing. I read many of your blog posts, cool, your blog is very good.
I don’t think the title of your article matches the content lol. Just kidding, mainly because I had some doubts after reading the article.
Thanks for sharing. I read many of your blog posts, cool, your blog is very good.
I don’t think the title of your article matches the content lol. Just kidding, mainly because I had some doubts after reading the article.