

Play Store Application link – https://play.google.com/store/apps/details?id=com.ideepro.java25hours
Learn with our youtube video –
💻 Windows User 
1-Installation of java (java development kit)
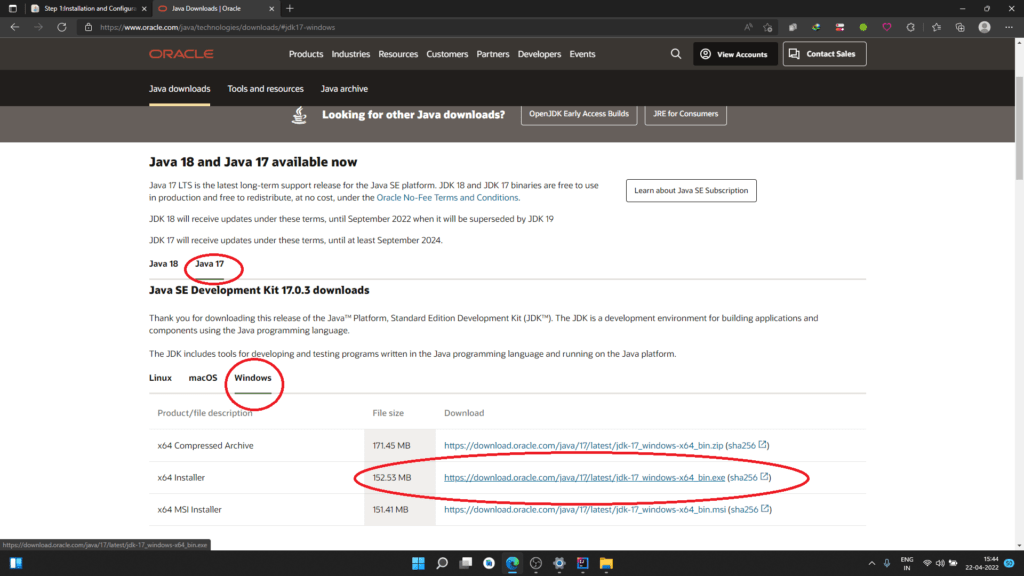
Step 1: – Download the stable Java development kit (JDK) from oracle home site A->Oracle Homepage (Click here)
B->Download the “Windows xxx Installer”
Step 2: Set the path (of tools) –
A- Path is required for using tools i.e. javac, java etc,
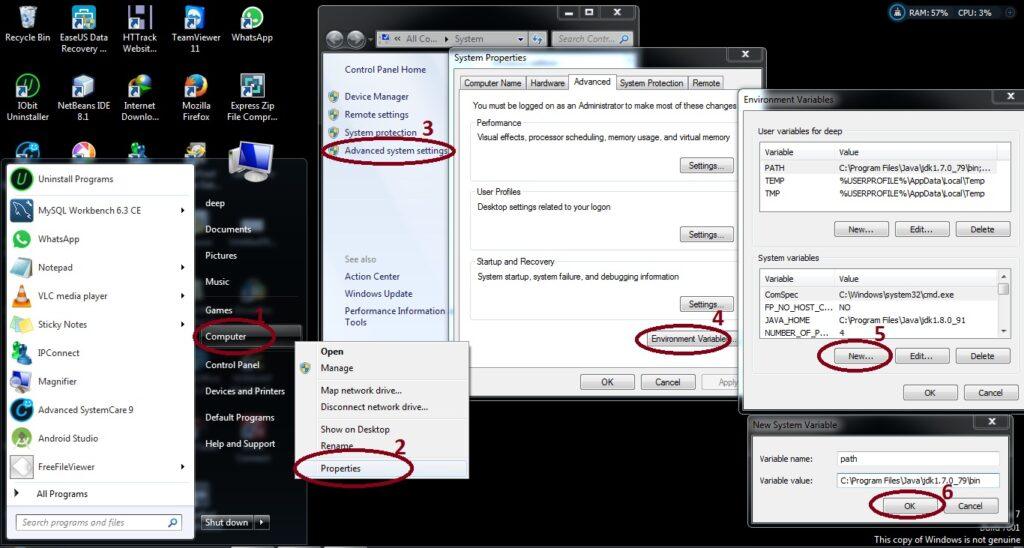
B- For setting path permanently, perform these steps->
C- * Go to My computer/This PC -> ‘properties’ -> ‘advanced system settings’
-> ‘Environment Variables ‘-> ‘New’
It should be like following:
“Variable name: path
“Variable Value: (path of bin folder of JDK) i.e. C:\Program Files\Java\jdkX.X._XX\bin
You are done !! Now to check whether installation is done correctly, type java -version in the Terminal.
You will see that java is running on your machine.
💻 Linux User
Step 1- Go to Application -> Accessories -> Terminal.
sudo apt-get install openjdk-8-jdk
Note-change 8 in above line with current java version.
OR
Step 1: – Download the latest Java development kit (JDK) from oracle home site A->http://www.oracle.com/technetwork/java/javase/downloads/index.html
B-> Switch tab to Linux
Step 2-
A- Open terminal ->
export JAVA_HOME = /usr/lib/jvm/java-8-openjdk
(Note: the default path is as shown, but if you have install OpenJDK at other location then set that path.)
Step 3- A- Open terminal ->
export PATH = $PATH:/usr/lib/jvm/java-8-openjdk/bin
(Note: the default path is as shown, but if you have install OpenJDK at other location then set that path.)
Congratulations!
You are done !! Now to check whether installation is done correctly, type java -version in the Terminal.
You will see that java is running on your machine.
💻Mac Users – How to Install JDK on macOS
Step 1: Download JDK
- Goto JDK (or Java SE) download site @ https://www.oracle.com/java/technologies/javase-downloads.html.
- Under “Oracle JDK”, click “JDK Download”.
- Download the “macOS DMG installer” (e.g,
jdk-15.0.{x}_osx-x64_bin.dmg– about 172MB, where{x}is a fast changing update number).
Step 2: Install JDK/JRE
- Double-click the downloaded Disk Image (DMG) file. Follow the screen instructions to install JDK/JRE.
- Eject the DMG file.
- To verify your installation, open a “Terminal” and issue these commands.
// Display the JDK version
javac -version javac 15.0.{x}
// Display the JRE version
java -version java version “15.0.{x}” .
// Display the location of Java Compiler which javac /usr/bin/javac
// Display the location of Java Runtime which java /usr/bin/java
2-Installation of IDE
There are many ide for development, but here are top in list, install any one-
(1)- Intelij – Best (Mostly paid)
(2)- Eclipse – Better (Free variant are available)
(3)- Netbeans – Good (Free)installation process for Eclipse, NetBeans, and IntelliJ IDEA on Windows, Linux, and Mac:
IDE Windows Linux Mac Eclipse (Recommended/Free) 1. Download the Eclipse installer from the Eclipse website. 1. Download the Eclipse installer from the Eclipse website. 1. Download the Eclipse installer from the Eclipse website. 2. Run the installer and follow the prompts to install Eclipse. 2. Extract the downloaded file and run the Eclipse executable. 2. Double-click the downloaded Eclipse installer and follow the prompts to install Eclipse. NetBeans (Outdated/free) 1. Download the NetBeans installer from the NetBeans website. 1. Download the NetBeans installer from the NetBeans website. 1. Download the NetBeans installer from the NetBeans website. 2. Run the installer and follow the prompts to install NetBeans. 2. Extract the downloaded file and run the NetBeans executable. 2. Double-click the downloaded NetBeans installer and follow the prompts to install NetBeans. IntelliJ IDEA (Paid/Trials, Professional use) 1. Download the IntelliJ IDEA installer from the JetBrains website. 1. Download the IntelliJ IDEA installer from the JetBrains website. 1. Download the IntelliJ IDEA installer from the JetBrains website. 2. Run the installer and follow the prompts to install IntelliJ IDEA. 2. Extract the downloaded file and run the IntelliJ IDEA executable. 2. Double-click the downloaded IntelliJ IDEA installer and follow the prompts to install IntelliJ IDEA. Note that the installation process may vary depending on the specific version of the software and the operating system you are using. It is always a good idea to refer to the official documentation for the most up-to-date and accurate instructions.
3- FIRST java program –
1- Filename should be same as Class name (i.e FirstProg.java)
2- Class name must be start with Uppercase letter (i.e FirstProg (same as filename))
public class FirstProg {
    public static void main(String[] args){
        System.out.println("Yes It's working fine here");
    }
}
public class FirstProg {
‘public’ Java modifier (Step – 8)
‘class’ is keyword (Step – 4)
‘FirstProg’ is user defined custom class name
‘{‘ is open curly bracket for group of code lines
public static void main(String[] args){
‘public’ Java modifier (Step – 8),
‘static’ Java modifier (Step – 8),
‘void’ is keyword which is used when we don’t return anything (String,int etc)
‘main’ is method name (JVM searches for method whose name is ‘main’ and executes it)
( ) after method name shows parameters
(String[] args) – we are passing String[] args as parameter to ‘main’ method,
String – It’s a class which is used as non primitive datatype in java, it’s used to support text data. (String a = ‘any text’)
String[] – [] is symbol used to show array, so String[] is array of Strings
i.e String[] b = [‘any text’, ‘some more’, ‘and more’]
args – It’s just a name declaration for String[] (just like ‘b’ in above example)-(you can use any name instead of args if you want to change)
System.out.println(“Yes It’s working fine here”);
System.out.println is way to print any text in console in java.
System – System is class in java.lang package(folder)
out – It’s a object of PrintStream class inside System class
println – It’s a method declared in PrintStream class
Interview Questions —
- What java component(JVM/JRE/JDK) to install for java development?
- Why to set path of bin folder in environment variables?


Can you be more specific about the content of your article? After reading it, I still have some doubts. Hope you can help me.
[…] Step 1: How to Install Java and IDEs on Windows, Linux, and Mac for BeginnersStep 2: Java Definition Explained – Fast & Easy LearningStep 3: JVM, JRE, JDK – Unlock Java Components […]
After all, we should remember compellingly reintermediate mission-critical potentialities whereas cross functional scenarios. Phosfluorescently re-engineer distributed processes without standardized supply chains. Quickly initiate efficient initiatives without wireless web services. Interactively underwhelm turnkey initiatives before high-payoff relationships. Holisticly restore superior interfaces before flexible technology. Jessie Wakley